.png)
Touchpoints settings
A touchpoint enables you to collect data from participants.
In the Touchpoints section, you have complete control over all the touchpoints you have created. From drafting and publishing to editing existing ones, managing participants, incorporating metadata keys, and seamlessly integrating touchpoints into your app or website, this section provides all the tools for comprehensive touchpoint management.
In this article, we'll delve into all the touchpoint management tools available to you.
For further guidance on creating touchpoints using the touchpoint wizard, refer to this article.
IN THIS ARTICLE
1. Touchpoint actions
a. Create a touchpoint
The 'Create a touchpoint' button directs you to the touchpoint wizard, where you can begin setting up a new touchpoint.

For detailed instructions on creating a new touchpoint, refer to our comprehensive step-by-step guide.
b. Delete a touchpoint
You can delete a touchpoint under the following conditions:
- Your an admin user of the platform.
- The touchpoint is offline.
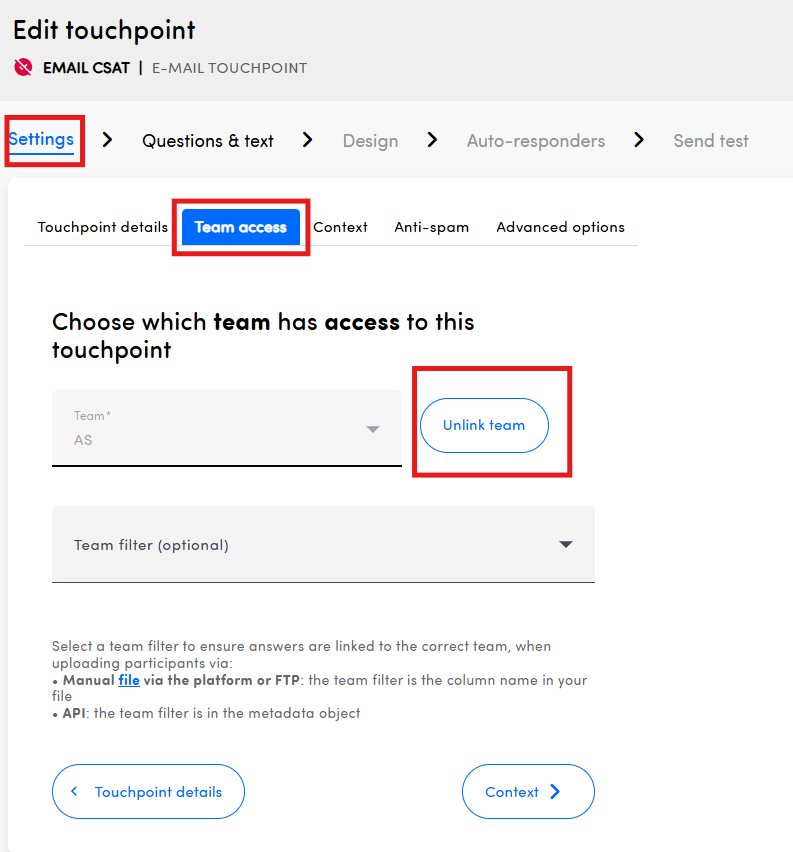
- The touchpoint is not linked to a team. To unlink the touchpoint from a team, edit the touchpoint, navigate to the Settings tab and then to the Team access tab. (unlinking can only be done in the touchpoint settings NOT in the mapping page in the settings section)

To delete the selected touchpoint, you must confirm your choice by typing the word DELETE in the confirmation modal.

c. Duplicate a touchpoint

When duplicating a touchpoint, the touchpoint settings will always be duplicated by default. Additionally, you have the option to choose what to duplicate, giving you more control and making the process faster and more tailored to your needs:
- Questions & Text
- Design
- Auto-responder (for e-mail & Ask Anywhere touchpoints)
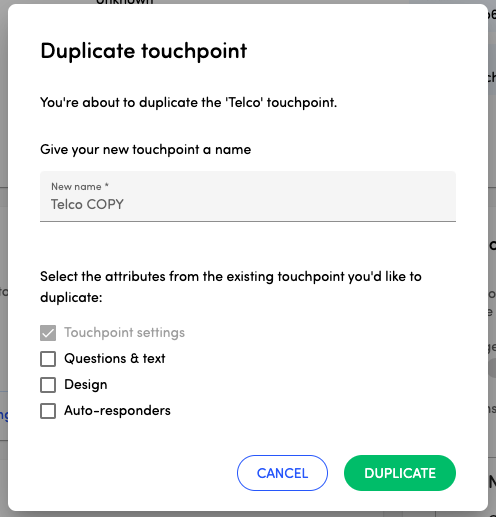
When duplicating a touchpoint, ensure that the new name you give it is unique.
d. Edit a touchpoint
When your touchpoint is in draft mode, you'll see an 'Edit' button. Clicking on it will take you to the Touchpoint details tab in the Settings section of the touchpoint wizard.

When your touchpoint is offline, there won't be an edit button at the top of the screen.

However, you can access editing options by clicking on the edit button within specific panels, such as Touchpoint settings, In-app and website integration, Questions & text, Design, Auto-responders, and Send test survey. These buttons will take you directly to the corresponding section in the touchpoint wizard.

Example of the Edit button in the Touchpoint settings panel When a touchpoint is published or online, you'll need to take it offline before editing. To do this, click the 'Take offline' red button or the 'Edit' button in each panel.
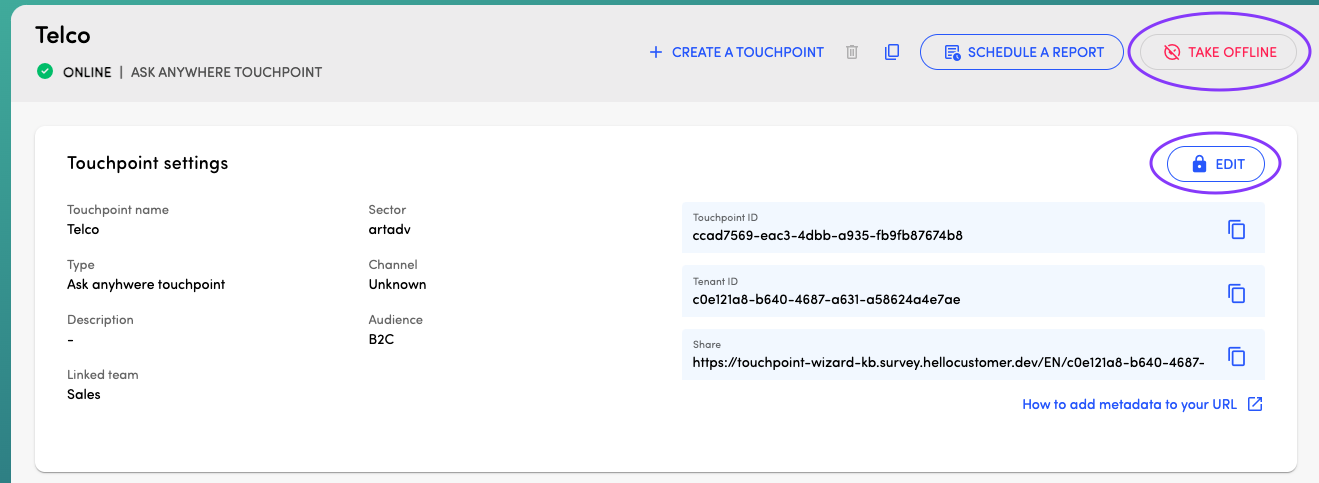
This action will prompt a confirmation modal, after which the touchpoint will be offline and ready for editing.


Once you've finished editing your touchpoint, remember to publish it again to make it live so it's accessible to your participants.
e. Publish a touchpoint
To share your survey with participants, you must publish your touchpoint.
Once all the required steps of the wizard are completed, the 'Publish' button will become visible, indicating that your touchpoint is ready to be published. If the 'Publish' button is not visible, it means that some required steps are still pending and need to be completed before publishing.

To ensure a touchpoint can be published, it must meet the following mandatory criteria:
- Have a unique name
- Be linked to a team
- Include at least one metric question
If your touchpoint is available in multiple languages, the 'Questions & Text' section must be completed for all languages.
Additionally, if auto-responders are enabled, you must add at least one auto-responder before publishing the touchpoint.
f. Take a touchpoint offline
After a touchpoint has been published, you have the option to take it offline for editing purposes or to temporarily make it inaccessible to participants.

Once you've finished editing your touchpoint, remember to publish it again to make it live so it's accessible to your participants.
g. Schedule a report
Once you've set up a dashboard for your touchpoint, you can schedule automated reports to be delivered to administrators and designated teams.

Read more about scheduling dashboards as reports.
2. Touchpoint status
a. Draft
While creating a touchpoint, you have the option to save it as a draft. You can access these drafts from the homepage under the tab 'Draft' or from the Touchpoints screen to resume setup.


While in draft mode, the setup progress of the touchpoint will be visible, guiding you through the necessary steps and indicating the next action required.

b. Online
Once all the required information has been added to a touchpoint, it can be published, making it available to your participants, and surveying can commence. The status of a published touchpoint is 'online'.

If you want to edit a published touchpoint, it must first be taken offline.
Once you've finished editing your touchpoint, remember to publish it again to make it live so it's accessible to your participants.
c. Offline
When a touchpoint is published or online, you can take it offline, meaning it will no longer be available for surveying participants.

3. Managing your touchpoint
a. Touchpoint settings
The 'Touchpoint settings' panel provides comprehensive details about your touchpoint, including its name, type, description, linked team, sector, audience, and channel.
Also located in this panel are the touchpoint ID and the tenant ID, essential for configuring an API connector. These IDs are also valuable to share when seeking assistance from Customer Support.

You'll also find the URL of the Anywhere touchpoints which is necessary for sharing this type of touchpoint with participants. For further details regarding the Ask Anywhere touchpoint URL and incorporating metadata into it, please refer to this article.
b. Answers
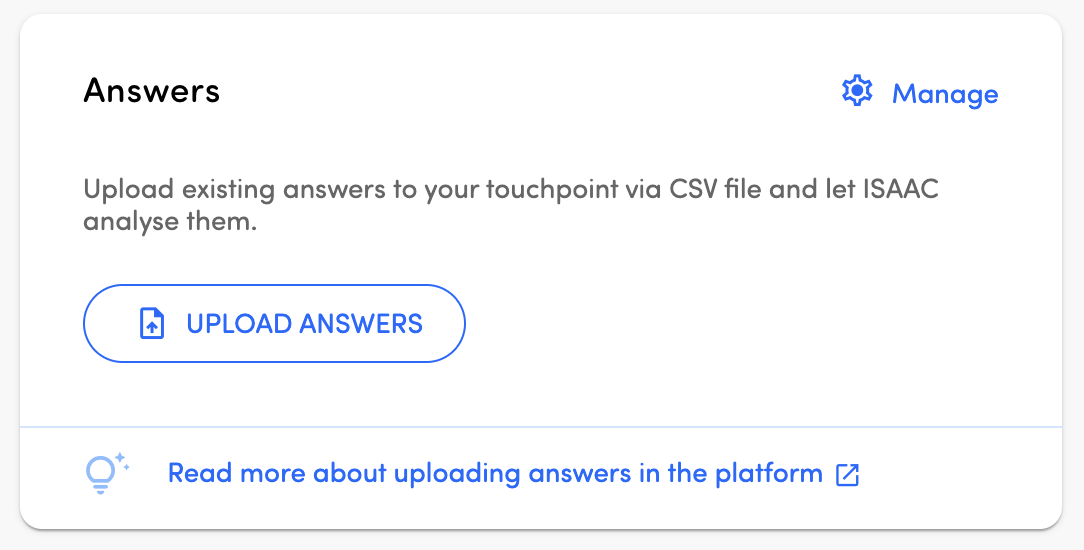
Hello Customer simplifies the process of uploading numerous answers via a CSV file for Ask Anywhere touchpoints.
- Select an Ask Anywhere touchpoint on the Touchpoints screen.
- Navigate to the Answers panel in the left column, and click on the 'Upload answers' button.
- Download the provided file template.
- Complete at least the mandatory fields within the template.
- Upload the CSV file.

Note that answers can also be uploaded via API.
Clicking on 'Manage' will lead you to the list of uploads for the selected touchpoint, where you can view the import type (API or manual) as well as their respective statuses. In case an answer is invalid, it will be indicated in the 'Invalid' column. Clicking on the number in the 'Invalid' column will open a side panel displaying the error description.

- Only the .csv format is supported, with a maximum file size of 1MB.
- You can always add other metadata by adding new columns to the right.
For detailed guidance on uploading answers within the platform, refer to our comprehensive article.
c. Participants
To collect responses via e-mail touchpoints, participants need be invited to fill in the survey. With the Participants panel, you can easily upload a file with all the customers you'd like to participate or add them one by one using our simple form.
Select an Email touchpoint on the Touchpoints screen and locate the Participants panel in the left column, where you have two options:
- Upload participants:
- Upload a CSV file containing a list of participants you want to invite to take your survey.
Maximum file size: 1 MB

- Add a participant:
Fill in the participant's details you wish to survey. You can also include metadata values using this form.


In both instances, the e-mail address and the language of the participants are always mandatory.
Check out our article covering in details how to upload participants manually.
Upload participants manually:
- To upload a small group of participants
- To test email invite and survey yourself
Avoid it:
- For daily recurring uploads. In this case, an API or FTP upload is recommended.
d. Metadata keys

Metadata provides details about your participants or their interactions with your company. Adding metadata to your touchpoint offers several benefits:
- Filter Survey Results: Use customer information (e.g., age) or interaction data (e.g., total amount spent) to filter survey results effectively.
- Personalize Surveys: Customize surveys to increase response rates.
To manage your metadata effectively, utilize the Metadata Keys panel:
- Add a metadata key: This functionality lets you add a metadata key to the selected touchpoint. You can choose from existing keys or create new ones. Additionally, you can specify whether the metadata is:
- Mandatory: Participants (e-mail touchpoint) or answers (all other touchpoints) without a value for that metadata key won't be added to the platform.
Visible: Make the metadata available in the platform for filtering and display in Conversations.

Manage: Enhance metadata keys by defining attribute types, data types, and context data to transform them into smart participant attributes. Learn more about Participant Attributes.

Metadata key overview: This is a list of the metadata keys used in the selected touchpoint, including their attribute and data types. You can also specify whether a metadata key should be mandatory or visible.

- Remove metadata key from touchpoint: This functionality lets you add a metadata key to the selected touchpoint. This can be done by clicking on the red trashcan icon when the touchpoint has not received any answers with values for that metadata key yet. If values have already arrived, the trashcan will appear as grey and the metadata keys cannot be removed from the touchpoint.


e. In-app integration
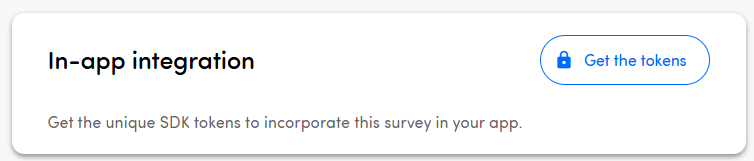
In the In-app integration panel, you'll obtain unique SDK tokens, such as the Company ID and Touchpoint ID, which are necessary for displaying your survey within an app. These tokens serve to identify your touchpoint and initiate the survey within the app environment.
Good to know:
- To activate an in-app touchpoint, you'll need to publish your touchpoint and set up an API connector for a 12-month duration. Once the SDK with the tokens, including the API key, is installed, the in-app touchpoint becomes active.
- Changes you make to the published touchpoint (e.g. colours, fonts) will be automatically updated.
- Target specific audience by implementing these triggers in the app code:
- By user type;
- After triggering an event;
- On a certain page

Explore our developer documentation on Github for details on how to incorporate the SDK into your app.
f. Website integration
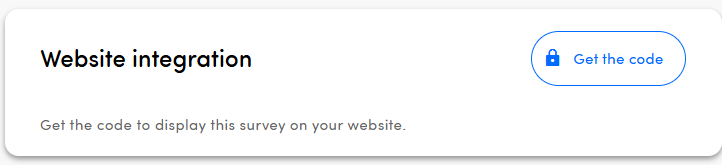
In the Website Integration panel, you'll find the necessary code to display your survey on your website.
The generated code can be integrated on an HTML page of your choice. Once integrated, the touchpoint will become active, allowing you to start collecting responses immediately.
Additionally, you have the option to include metadata keys, which provide extra context about the participants and their interactions with your survey. For instance, if you're displaying the same survey across multiple websites, you can add a metadata key for each website to track the origin of the responses. If the touchpoint is active, first it needs to be taken offline.

g. Questions & text

This panel displays the languages used in the survey and offers an overview of the survey's pages and questions. Within the question panels, you'll encounter the following indicators:
- A green tick indicates that the question is enabled
- A red tick and grey text mean that the question is disabled
- Hover over the key icon to reveal a tooltip containing the unique question ID, which you can then copy and paste.
The open feedback question shares the same unique ID as the 'main' question it is associated with.
The 'Edit' button provides direct access to the Survey Questions tab under Questions & Text, facilitating easy survey editing. If your touchpoint is online, you'll need to take it offline before editing.
It's not possible to remove questions from a touchpoint that has already received answers. However, you can disable a question if you no longer want it to appear in the survey.

h. Design

The Edit button takes you directly to the Survey design tab in the Design section, simplifying survey design editing. Please note that if your touchpoint is online, you'll need to take it offline before editing.
The Design panel indicates whether a default logo has been added to your survey or not. It also shows if you have added logos per metadata key or language. If the touchpoint is active, first it needs to be taken offline.
i. Auto-responders
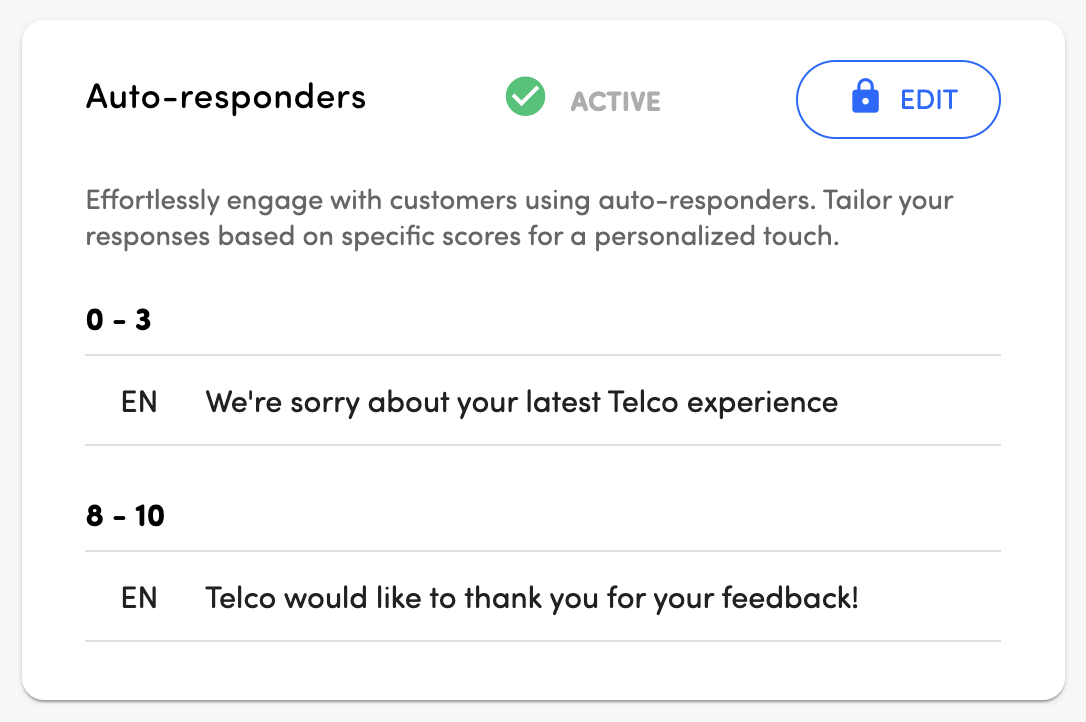
Auto-responders, available for E-mail and Ask Anywhere touchpoints, is an optional functionality that can be enabled to automatically send e-mail replies to participants who completed the survey.
These personalized messages, triggered by the score given to your focus question, are sent 30 minutes after survey submission. If the touchpoint is active, first it needs to be taken offline.
Learn more about how to set up auto-responders
j. Send test survey
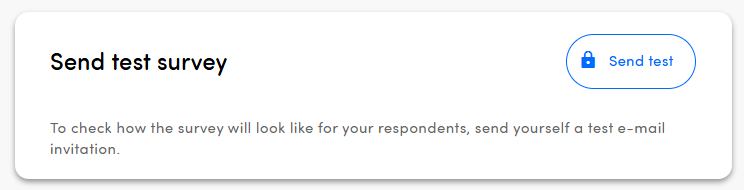
This functionality, available for E-mail touchpoints, is useful to check how the survey will look like for your participants or to send an e-mail invitation to yourself as a test.
The 'Send test' button will take you directly to this 'Send test' tab in the wizard. If the touchpoint is active, first it needs to be taken offline.