.png)
Manual - Create a new touchpoint
Everything starts with collecting data from participants. To do this, you'll need a touchpoint with at least one metric question.
There are various touchpoint types, each serving different purposes, and the choice of questions depends on your specific use case. To assist you in selecting the most suitable touchpoint and metric, we've prepared a comprehensive guide.
In this article, we'll focus on the practical steps to create a touchpoint.
Creating a new touchpoint is restricted to administrators.
IN THIS ARTICLE
- Create a new touchpoint
- The touchpoint wizard
- Settings
- i. Touchpoint details
- ii. Team access
- iii. Context
- iv. Anti-spam settings
- v. Advanced options
- Questions & text
- i. Languages
- ii. Survey questions
- iii. Survey completion
- iv. Invitation e-mail (e-mail touchpoints)
- v. Reminder (e-mail touchpoints)
- vi. Already answered (Ask Anywhere and e-mail touchpoints)
- Design
- 1. Survey type / Dialog box
- 2. Layout
- 3. Buttons
- 4. Text styling
- ii. Logo
- Auto-responders
- Send test
- Integration
- Get your survey to participants
1. Create a new touchpoint
You have two options to create a new touchpoint:
- Navigate to the 'home' screen of our platform. You'll find a green button for creating a new touchpoint.
- Alternatively, access the Touchpoint settings. At the top section of the screen, you'll find a 'Create touchpoint' link.

Both options will guide you to the Touchpoint Wizard, where you'll initially select the type of touchpoint you wish to create:
- E-mail touchpoint: Send survey invitations via e-mail to your participants. This option is suitable when you have the e-mail addresses of your customers.
- Website touchpoint: Embed a survey directly into your website.
- Ask Anywhere touchpoint: Generate a link or code to collect feedback through various channels.
- In-app touchpoint: Gather feedback from Android or iOS mobile apps.
To learn more about choosing the right touchpoint type for your use case, click here.
IMPORTANT
When you create a new touchpoint, its data will not appear on the homepage until the following day, even if responses have already been processed. However, this data will immediately be available in other sections of the platform—such as dashboards, conversations, and analysis—as soon as the first responses are processed.
2. The touchpoint wizard
Setting up a touchpoint involves multiple steps, and our touchpoint wizard will guide you through them. Note that some steps may differ depending on the touchpoint type.
The top navigation bar offers three key functionalities to aid you in efficiently managing your new touchpoint throughout various stages of the process:
| Save as draft |
During touchpoint creation, you can save it as a draft to complete later. To resume the creation of your touchpoint, visit the Draft tab on the homepage or navigate to the Touchpoint settings section.
|
|---|---|
| Delete a touchpoint | Deleting a touchpoint is possible only if there are no answers, participants uploaded, or team linkage. |
| Duplicate a touchpoint |
A touchpoint in any status can be duplicated, allowing you to choose what to replicate: Questions & text, Design, and Auto-responders.
|
a. Settings
In the Settings section of the touchpoint wizard, you'll set up the general configurations for your new touchpoint.
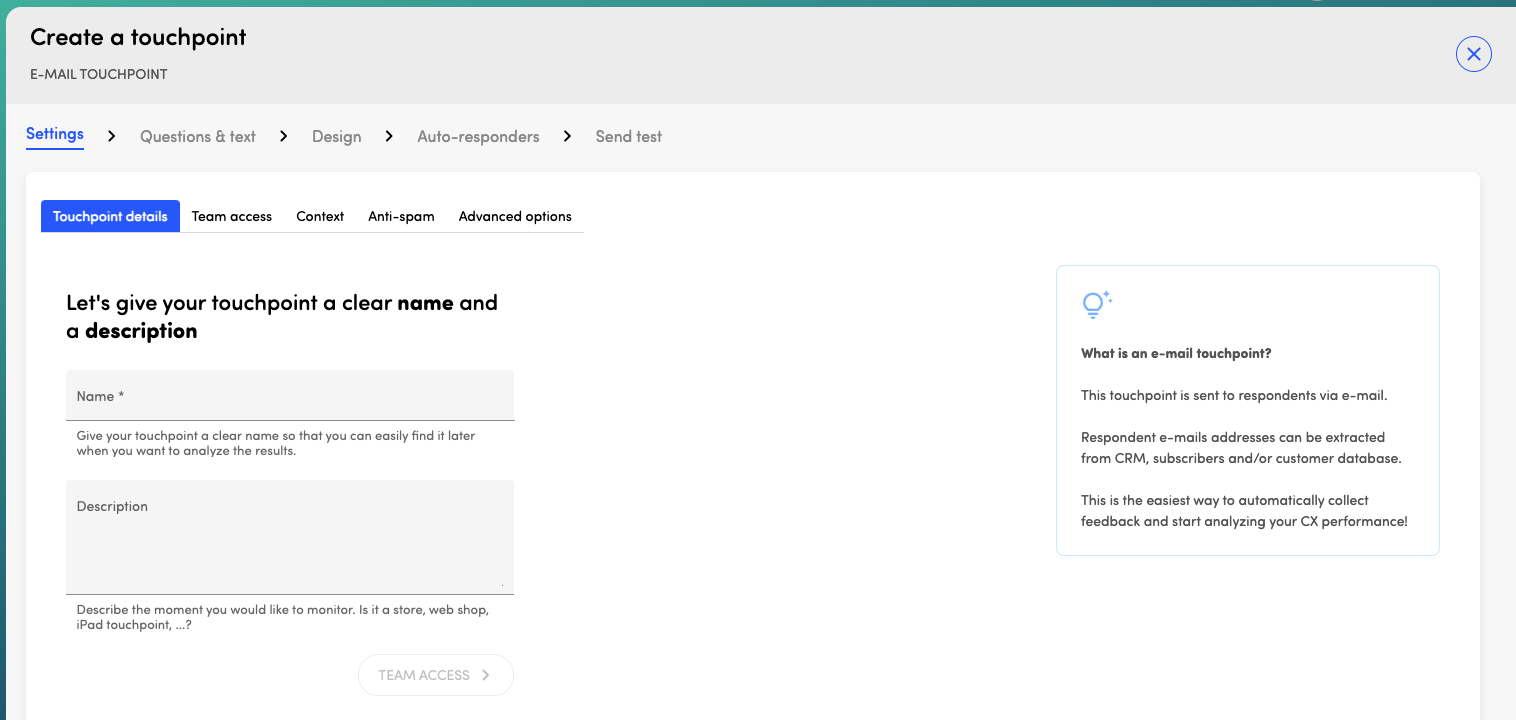
i. Touchpoint details
First, provide a name for your touchpoint and add a description to explain its purpose or usage.
| Name | Enter a name for your touchpoint that has not been used before. |
|---|---|
| Description | Describe your touchpoint. Is it associated with a specific store, season, time, or any other distinguishing factor? This information is solely to assist you in identifying your touchpoint more effectively and will not be visible to participants. |
ii. Team access
Selecting a team determines who has access to this touchpoint. Selecting a team filter ensures that responses from participants uploaded to the platform are correctly linked to the correct team.
| Team | To get the correct data to the correct people, it is mandatory to link your touchpoint to a team. You have the option to select an existing team or create a new one. |
|---|---|
| Team filter | This step is optional, but it ensures that answers are correctly linked to the appropriate team. You have the option to select an existing team filter or create a new one.
|

The values on the metadata key represent the lowest level in your team structure, also referred to as 'units'. These units can be organised in a multi-level team structure. Each team is assigned users and permissions, determining the data visible to users and the parts of the platform they can access.
To learn more about teams and which team structure best fits your organization, please refer to this article.
IMPORTANT
Make sure your team filter has the exact same spelling as the metadata key you include in :
- Your URL (for Ask Anywhere touchpoints)
- Your integration code (for Website and In-app touchpoints)
- The column containing this key in your upload file or API JSON (for E-mail touchpoints).
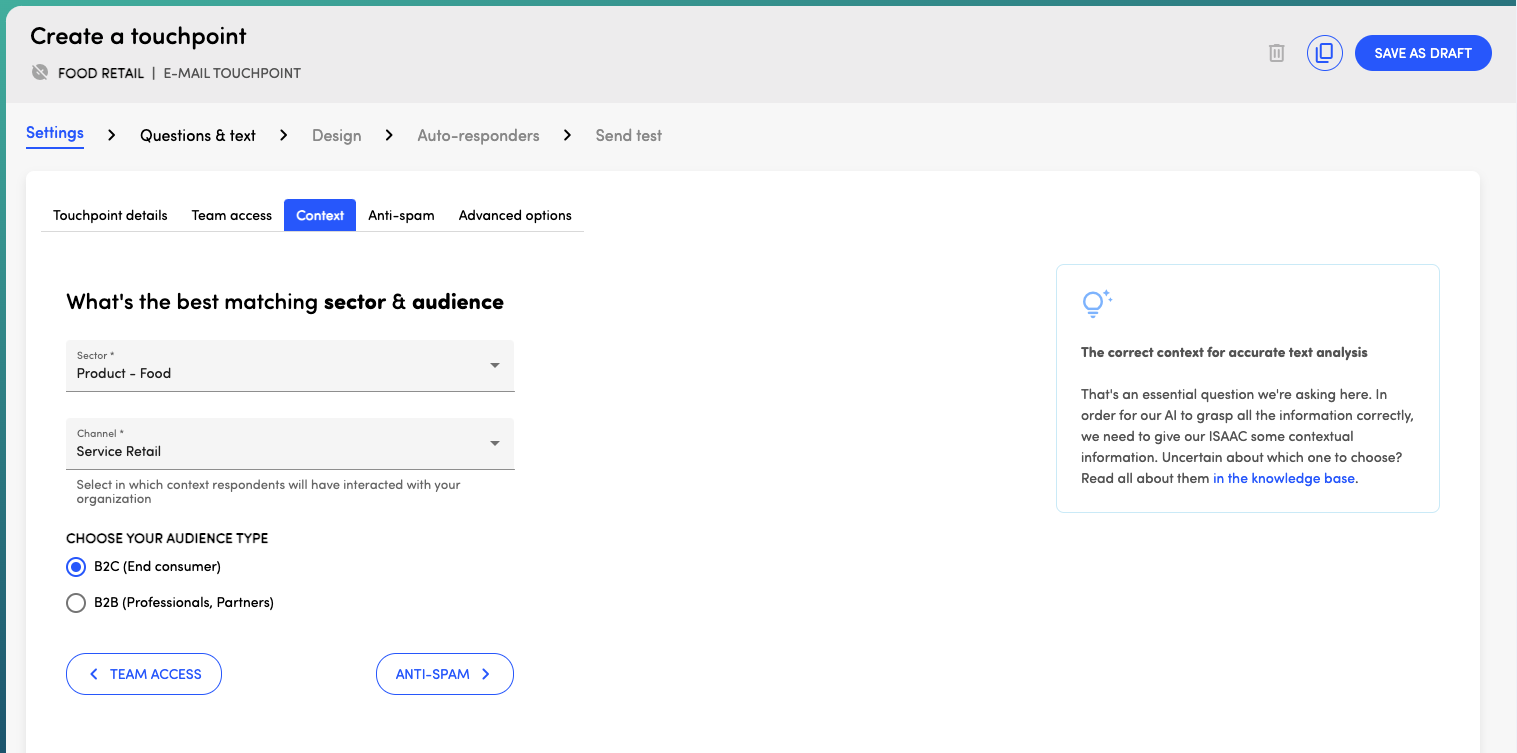
iii. Context
Selecting the context of your touchpoint is crucial to optimize the effectiveness of ISAAC, our text analysis AI.
| Sector | Select the sector that best fits your company's activity. You can get an overview of all available sectors here.
The default value is the value selected in Account settings and can be modified as required.
|
|---|---|
| Channel | Select in which context participants will have interacted with your organization. You can get an overview of all available channels here. |
| Audience | Select the type of participants you intend to survey: are they end-consumers (B2C) or other businesses (B2B)? If conducting an internal survey, it's advisable to choose B2B.
The default value is the value selected in Account settings and can be modified as required.
|
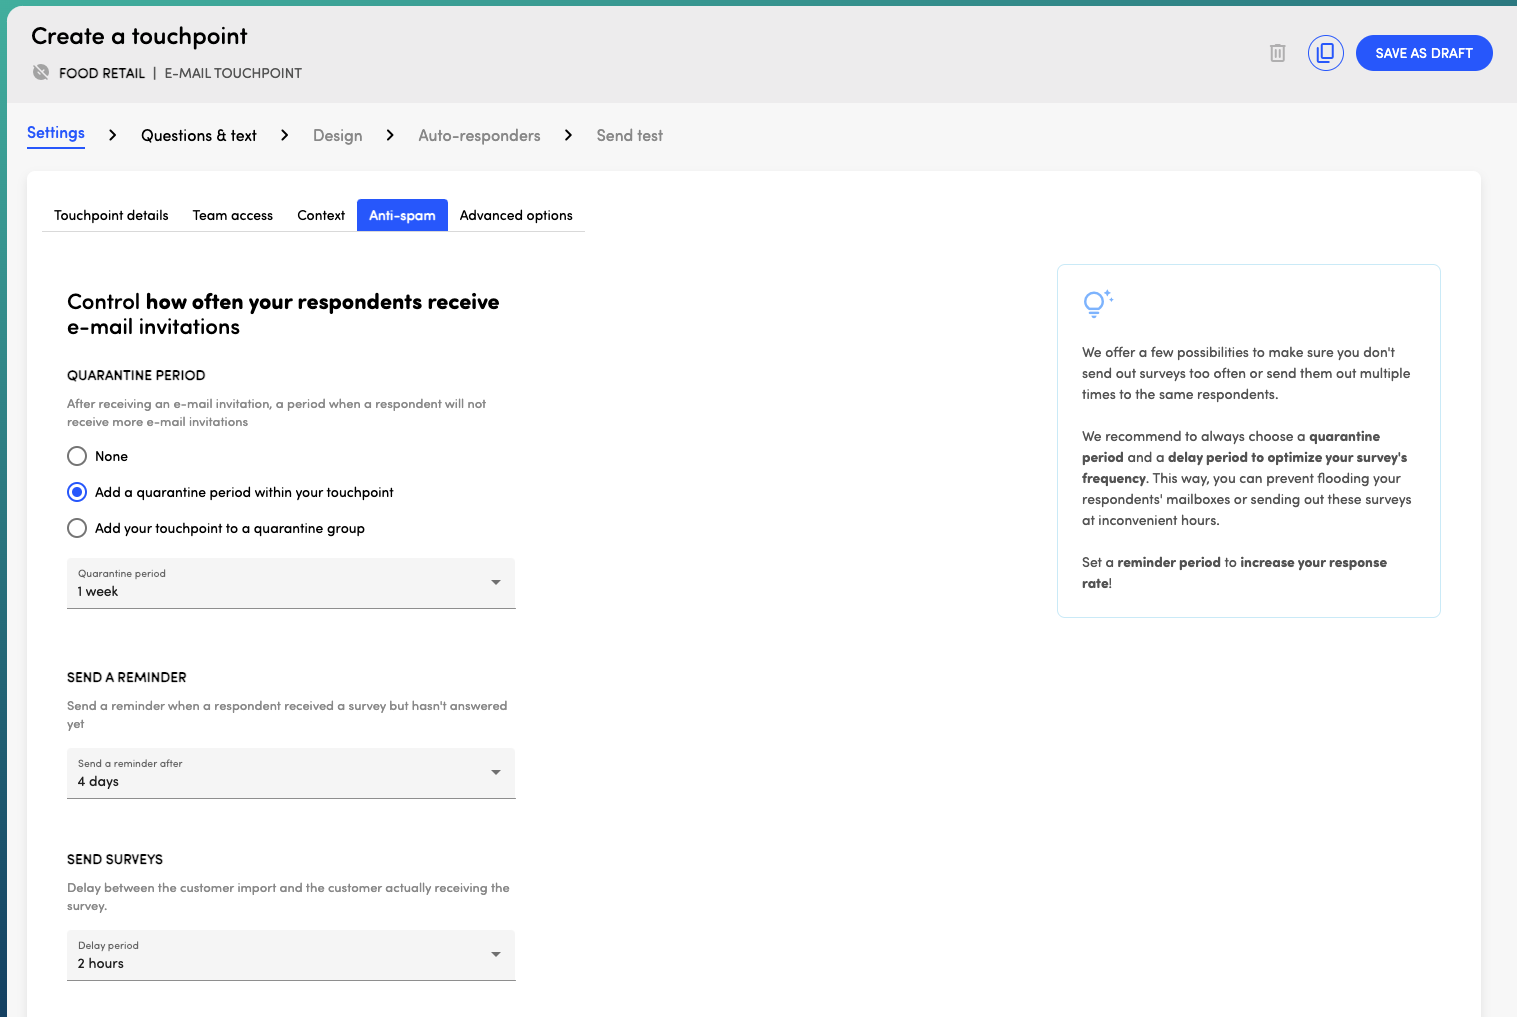
iv. Anti-spam settings
We offer several options to make sure you don't send out surveys too often or send them out multiple times to the same participants.
We recommend to always choose a quarantine period and a delay period to optimize your survey's frequency. This way, you can prevent flooding your participants' mailboxes or sending out these surveys at inconvenient hours. We recommend setting a reminder period as it helps increase your response rate. Only one reminder can be configured per touchpoint.
| Quarantine period | E-mail, Ask anywhere and Website touchpoints | A quarantine period is a duration wherein a participant, having either received an email invitation or completed a survey, will not receive further email invitations or access to surveys. This period ranges between 1 day and 1 year.
|
|---|---|---|
| Reminder period | E-mail touchpoints | After the first e-mail invitation is sent, you have the option to send a reminder after a certain period to participants who have not yet responded to the survey. This reminder is sent once the specified time period has elapsed, at the same time of day the original invitation email was sent. If the reminder period is edited, the participants that have already been uploaded, will be sent the reminder after the original time selected. For example, if the reminder is changed from 1 to 7 days, the participants that were already uploaded will receive the reminder after 1 day, while the new participants will receive it after 7 days. Please note that selecting a quarantine period is necessary to activate reminders. This prevents participants from receiving a second invitation before receiving a reminder for their initial invitation to complete the survey. |
| Delay period | E-mail touchpoints | After uploading participants, you have the option to delay sending out surveys for a period ranging from 1 to 96 hours. This can be useful, particularly if you upload participants at night. If the touchpoint is offline, the delay period won't start counting until the touchpoint is put online. When offline, the status of the participants will be "waiting for touchpoint", after this it will change to "delayed" until the delay period ends. |
v. Advanced options
| Enable anonymous responses | All touchpoints | The personal data of a respondent (first name, last name, e-mail address, phone number, and custom ID) will not be visible in the platform. This setting cannot be modified after the first response has been received. |
|---|---|---|
| Partial Answers | All touchpoints | Occurs when a participant opens a survey and begins to fill it out but does not complete or submit it. The system allows a 24-hour window from the initial opening of the survey during which the participant can return to the survey and update or complete their answers. After this period, the partial answer will be finalized and their incomplete responses will be recorded as their final submission. Partial answers are hidden by default. You can display them in the platform going to the touchpoint settings > advanced options. (Partial answers will be visible the next day after enabling this option). |
| Enable adjustments to a given score | E-mail touchpoints | When enabled, participants can change their given score until the end of the survey validity period. |
| Survey validity | E-mail touchpoints | The survey validity period refers to the timeframe within which participants can respond after receiving the email invitation. The default and maximum configurable period is six months (183 days). During the validity period:
Additional notes:
|

IMPORTANT
Partial answers
In our survey system, answers are captured per page. This has a few important implications for how partial responses are stored:
- ✅ If a participant drops out while on a page, all answers from the previous pages will still be saved.
- ❌ If a participant navigates back to a previous page, the answers on any subsequent pages will not be retained.
This behavior ensures that only the data explicitly confirmed by the participant (by navigating to the next page) is stored.
b. Questions & text
Building your survey is easily done within the "Questions & text" section. Begin by selecting the languages spoken by your participants. Next, add your questions. Finally, add any necessary text elements, such as completion messages or e-mail invitations for e-mail touchpoints. Let's get started!
i. Languages
- Select the languages in which to survey your customers. The survey will be available in the languages that you select.
- The primary language is pre-filled with the default language selected in the account settings, though it can be modified if needed. The survey questions will be displayed in the primary language in the platform and reports.
- You'll need to provide survey questions, subject, introduction message, thank you message in the selected languages. All questions and texts must be added in all languages to publish a touchpoint.

Important:
- Selected languages can be edited or deleted whilst no responses have been received.
- Our AI will do its work on all of these languages.
- When a participant opens a Survey URL from an Ask Anywhere Touchpoint, the survey will automatically switch to the default language to which the browser is set in (if it is a language set in the survey).

ii. Survey questions
It's all about asking one smart question! At Hello Customer, we strongly believe that short surveys are preferred over long surveys that tire your participants. Therefore, we offer three metric questions that combine a score question and an open text question in which participants can explain why they give a certain score.
- Every survey in Hello Customer begins with a focus question, which must be a metric question, but can be followed by additional questions.
- You can even ask questions to identify your participants if you're not using an e-mail touchpoint.
- For detailed insights into our questions, we recommend reading this article.
To take it a step further, it is possible to personalize your survey questions by adding metadata in the question text. Learn how to do this here.
1. Focus question (or metric question)
Start by adding a mandatory focus question to your survey. You can choose from three metric questions: NPS, CSAT or CES.
- These questions include a scale question and an open text question, which will be analyzed by our AI text engine, ISAAC.
- You have the option to select our pre-written questions, which we highly recommend as they have proven successful with good response rates. Alternatively, you can write your own custom questions. If you choose to do so, we recommend closely following our recommended formulation for optimal results.
- The focus question is always mandatory. Nevertheless, you have the choice to disable the open feedback portion.

You can include each metric question only once in your survey. However, you can add as many extra questions as needed and combine different metric questions within one touchpoint.
For instance, you can combine a CSAT question and multiple 1-5 questions to gauge customer satisfaction regarding various interactions followed by an NPS question to assess whether customers would recommend your company in general.
2. General questions
Optionally, you can add general questions to your survey:
- 0-10 score
- 1-5 score
- Multiple choice with either multiple answers or only one answer
- Open text question
- Yes / No

While you can add as many general questions to your survey as you like, we recommend keeping your survey as short as possible!
3. Metadata questions
In Ask Anywhere, Website, and In-app touchpoints, you also have the option to add metadata questions, which gather additional information about your participants.
These questions work differently from the other types of questions because their answers are stored as metadata value rather than survey responses. Therefore, it's crucial to specify the metadata key where the answers to those question should be stored.
The metadata questions are:
- Date picker: Ask for a specific date, such as the date of the visit.
- Profile question: Add a question to collect valuable information about a participant (first name, last name, phone number and e-mail address).
- Team picker: Ask participants to specify the shop they visited or the person they spoke to. This ensures that their answers are linked to the correct team, and that the correct data gets to the correct person within your organization.

IMPORTANT
Make sure to fill out all the questions in every language of your survey! This helps prevent errors when saving.
4. Submit button & footer
- Customize the label of the Submit button. This text is necessary in all languages of the survey.
- Additionally, you have the option to include text at the end of the survey, such as a disclaimer.
Please note that these texts are required in all languages of the survey.

5. Managing pages and questions
- To design the perfect survey, you have the flexibility to add or delete pages
- You can edit, delete, or rearrange questions as needed.
- You have the option to disable any page or question, which means they won't appear in the survey.
- Questions and open text questions can be set as mandatory or optional. If not mandatory, participants are not required to answer them to complete the survey.
- Preview a specific page of the survey by clicking the 'eye' icon next to the page. This enables you to view the particular survey page without needing to complete the survey to access it.
- You can preview the survey on desktop or mobile devices, as well as full screen in a new tab.
- The answers submitted to the survey while in preview mode are not saved.
Did you know you can customize which participants see specific pages based on their metadata values or their responses to previous questions? Learn more on the dedicated page about page logic.

You can personalize your survey texts by adding metadata. This can potentially help to increase your response rates. Learn how to do this here.
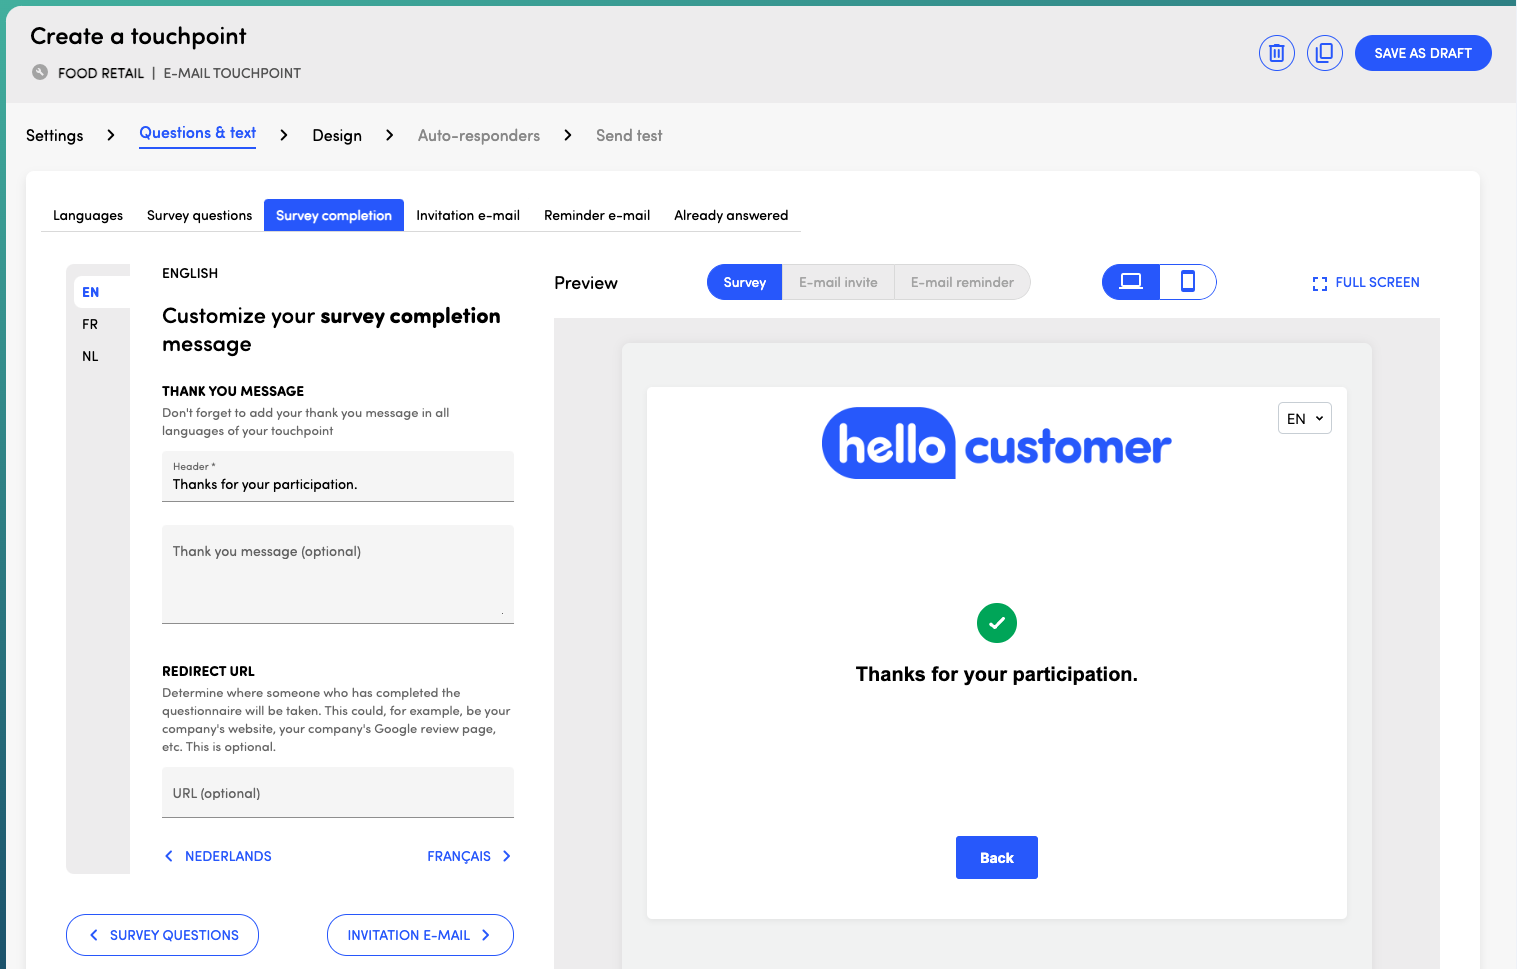
iii. Survey completion
This message is displayed after a respondent completes the survey.
- A header is mandatory.
- Optionally you can add a thank you message below the header.
- A redirect URL can be added. It determines where someone who has completed the questionnaire will be taken. This could, for example, be your company's website, your company's Google review page, etc. This is optional.
iv. Invitation e-mail
E-mail touchpoints
Personalize the invitation e-mail people will receive in their inbox. To make the survey more engaging and appealing for participants to respond:
- Select a name and e-mail address from which the survey is sent
- Customize the subject line
- Craft an engaging introduction text
- The unsubscribe label is shown at the bottom of the e-mail. When clicking this URL, participants are redirected to a page where they can unsubscribe. Once this process is finished, the message when unsubscribed will appear.
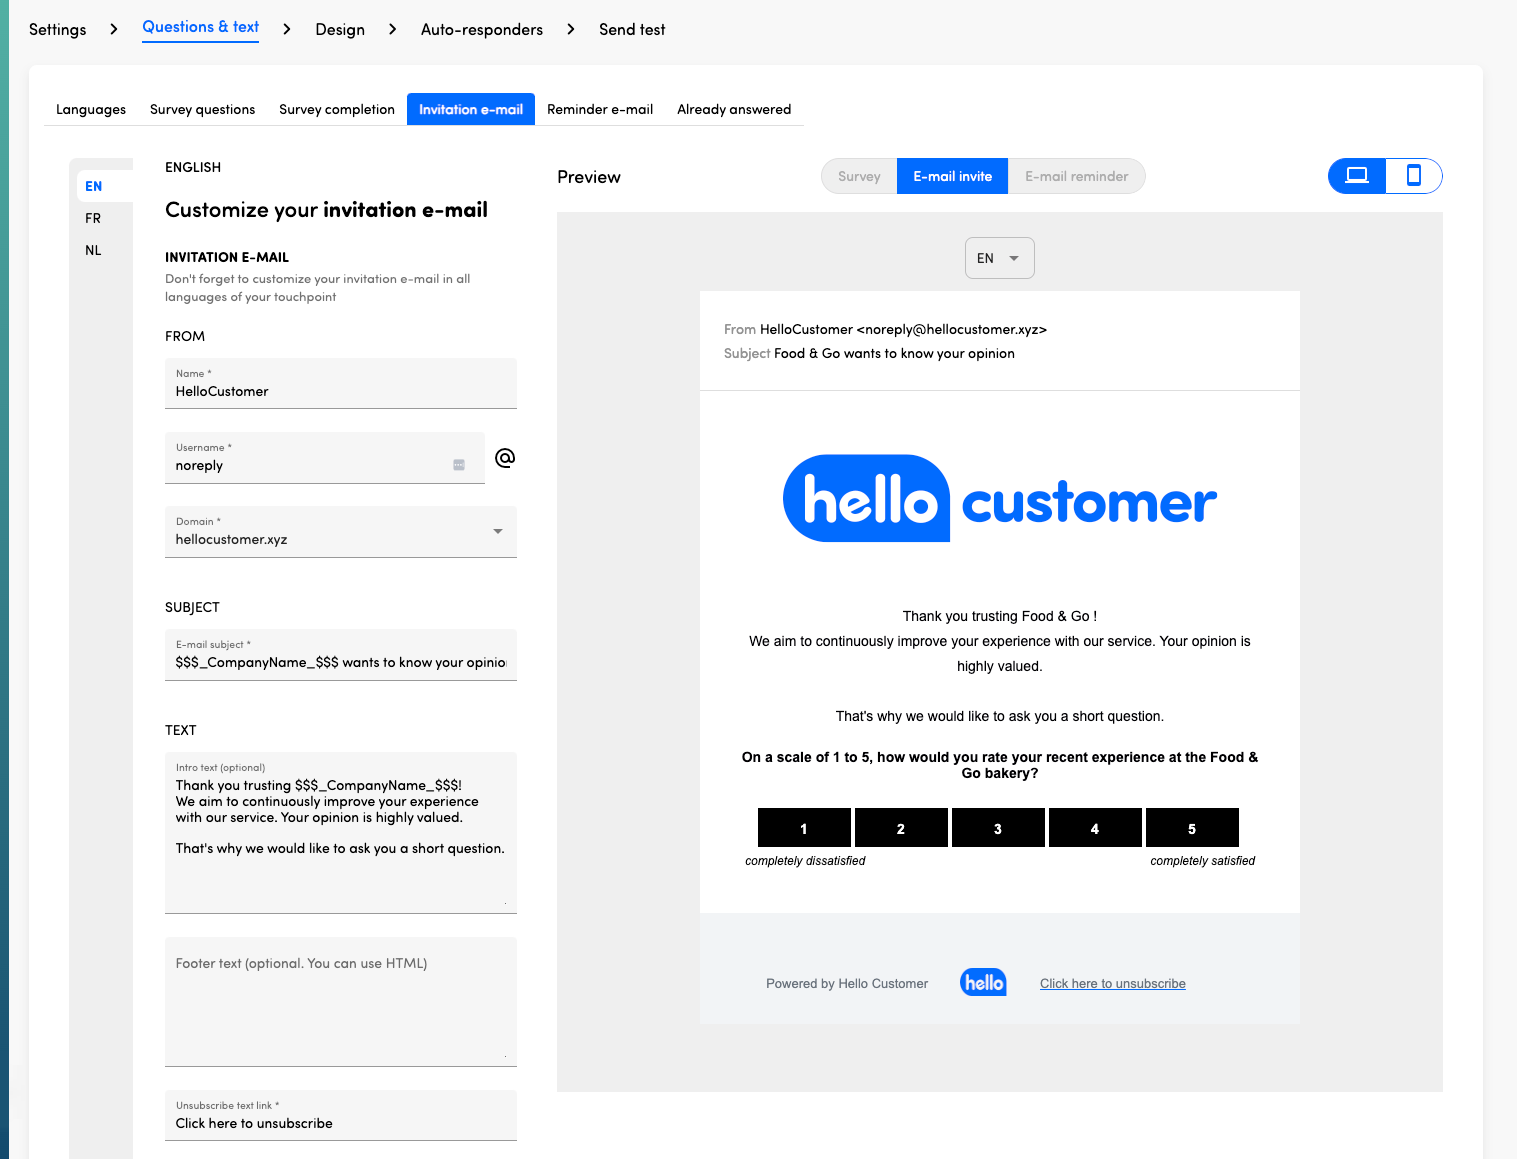
By default, your e-mail will be sent from the domain "hellocustomer.email". You have the option to customize the part before the "@" symbol.
If you prefer to send your e-mails from a different domain, please reach out to support@hellocustomer.com or your customer success manager to discuss available options.
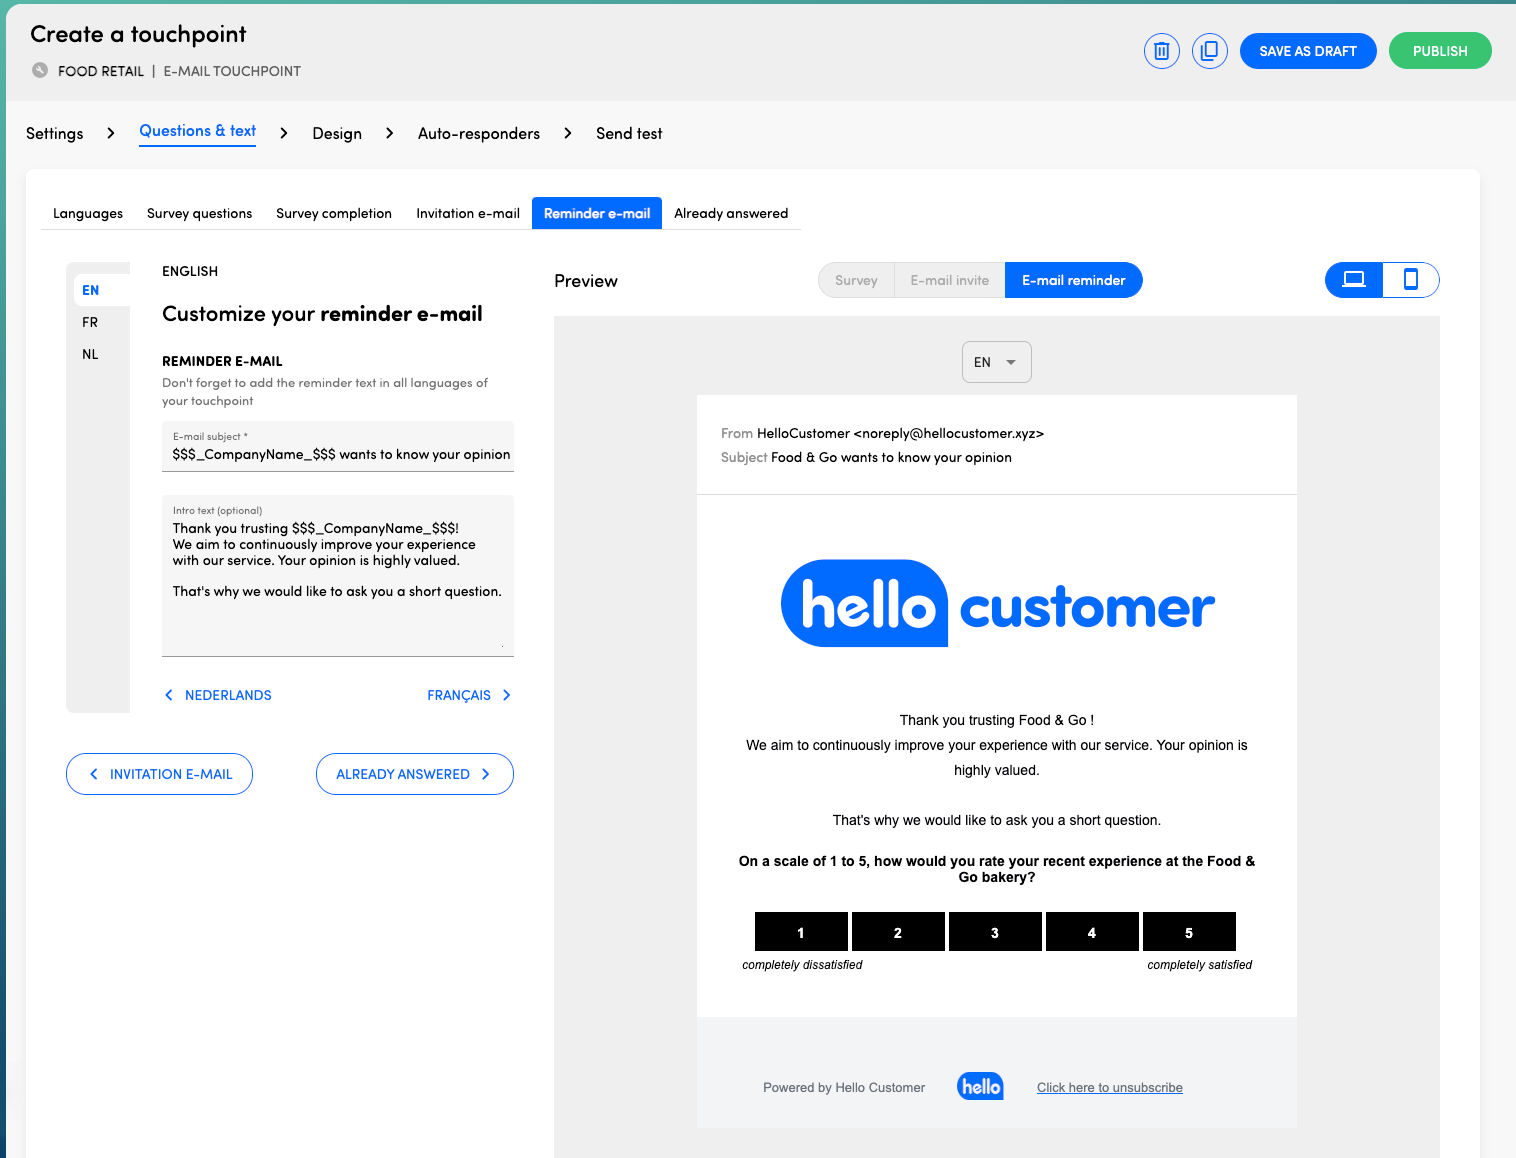
v. Reminder
E-mail touchpoints
This tab is only visible if a reminder period has been selected in Settings > Anti-spam.
We recommend adjusting the subject and introduction text slightly to indicate that it is a reminder for the same survey.
vi. Already answered
Ask Anywhere and e-mail touchpoints
The 'already answered' message is displayed when a respondent attempts to answer the survey directly after already completing it, or when the respondent is in quarantine (defined in the setup of the touchpoint).

c. Design
In the Design section, you have the option to customize the appearance of the survey components.
i. Survey design
Please note that for e-mail touchpoints, selected styling options will be applied to both the survey and e-mail layouts. However not all fonts are recognized by every e-mail client. If the chosen font is not recognized, the texts will be displayed in Arial.
1. Survey type / Dialog box
For website and in-app touchpoints, you can choose how the survey will be displayed on your website or within your app:
| Website touchpoints |
|
|---|---|
| In-app touchpoints |
|


2. Layout
You have the option to integrate your own custom CSS, which gives you complete control over the appearance of the survey to, for example, perfectly match your organization' branding styleguide.
To learn more about custom CSS, please refer to this article.
PAID FEATURE
Please note that custom CSS is a paid module. If you're interested in learning more about this feature, contact your customer success manager or e-mail support@hellocustomer.com.
You can also select the layout of the score buttons. If the survey is primarily viewed on mobile devices, we recommend the stacked buttons layout.

3. Buttons
You have the option to choose either a single-color button, which you can customize, or our default color scale.

4. Text styling
The default font used for the question and paragraph text is Arial, and the default text color is black.
However, you have the option to customize the fonts and text colors for the question and paragraph to align with your branding style guide.

Please note that not all fonts are recognized by every e-mail client. If the chosen font is not recognized, the text will be displayed in Arial font.
ii. Logo
While adding a logo to your survey is optional, we highly recommend uploading your own logo to boost recognition and enhance the credibility of your survey.
| Default logo | You can upload a default logo, which means all participants will see the same logo. If no specific logo is uploaded for a language or a metadata key value, the default logo will be used.
|
|---|---|
| Add a logo per language | Upload a specific logo per language. This option is useful if your logo differs across different languages.
|
| Add a logo per metadata key value | Upload a specific logo per metadata key value. For example, if your offices each have a unique logo featuring the name of the office manager, you can add a logo for each office. By incorporating specific logos for different metadata key values, you can maximize the personalization of your surveys. Check out our articles about metadata keys and values, as well as adding logos per metadata key value, for more information.
|


Make use of our logo editor to crop, resize and position your logo.
To preview your logos:
- Use the language dropdown in the preview panel to preview the logo you've selected for each language.
- Use the 'eye' icon next to each metadata key value to preview its corresponding logo.
- If no specific logo is uploaded for a language or a metadata key value, the default logo will be used.
- Recommended logo dimensions: 435x135px.
- Maximum size: 1024kB.
- Supported file formats: GIF, JPG, PNG.
d. Auto-responders
E-mail and Ask Anywhere touchpoints
Enable auto-responders to automatically send e-mail replies to participants who completed the survey. These personalized messages, triggered by the score given to your focus question, are sent 30 minutes after survey submission. The optional auto-responder feature is a valuable tool for automated marketing, thanking customers for their feedback, and emphasizing the importance of their opinions.
This feature is available for the following touchpoints:
- E-mail touchpoints: Participants' e-mail addresses are already known.
- Ask Anywhere touchpoints:
- Make sure to include participants' e-mail addresses in the URL. Learn more about adding e-mail addresses to URLs in this article.
- You can also capture participants' e-mail addresses through a profile question. The e-mail address provided by the participant is then automatically saved and used without any additional effort on your part. However, if an e-mail address is missing, no auto-responder will be sent.

- Once auto-responders are enabled, it's essential to add at least one auto-responder in one language
- You can add auto-responders for different score ranges within one language, allowing you to tailor the e-mail subject and message to each specific score range situation.
To setup an auto-responder, you'll need to specify:
- Language: We recommend to send an auto-responder for the same score for each language, but this isn't mandatory.
- Score range of the focus question: Define the minimum and maximum scores for which this auto-responder will be sent.
- E-mail subject.
- E-mail message: You can opt for custom HTML if, for example, you want to include a URL in your message.
- Display logo: Choose whether to display your logo in the auto-responder e-mail or not. Please note that the logo won't be shown if you use custom HTML.
- Display participants answer and score: Decide whether to display the answer and score to which this auto-responder is given in the e-mail. This can be useful if your respondent is likely to receive several surveys.
IMPORTANT
- Your customers won't be able to reply to this auto-responder. To ensure they can contact you, we recommend including an e-mail address in your auto-responder text.
- Auto-responders cannot be tested using the Send test function since this does not produce a record of the answers on our database. You need to add yourself as a participant and complete the survey. After testing the auto-responder, you can remove the answer using the API call delete:answer.
If the auto-responder feature is enabled, at least one has to be configured, otherwise, the touchpoint cannot be put online
e. Send test
E-mail touchpoints
For e-mail touchpoints, you have the option to send test e-mails.
- Specify the language for the test e-mail
- Choose the e-mail address where you want to send the test
- Select whether to send the test e-mail invitation or the test reminder e-mail.
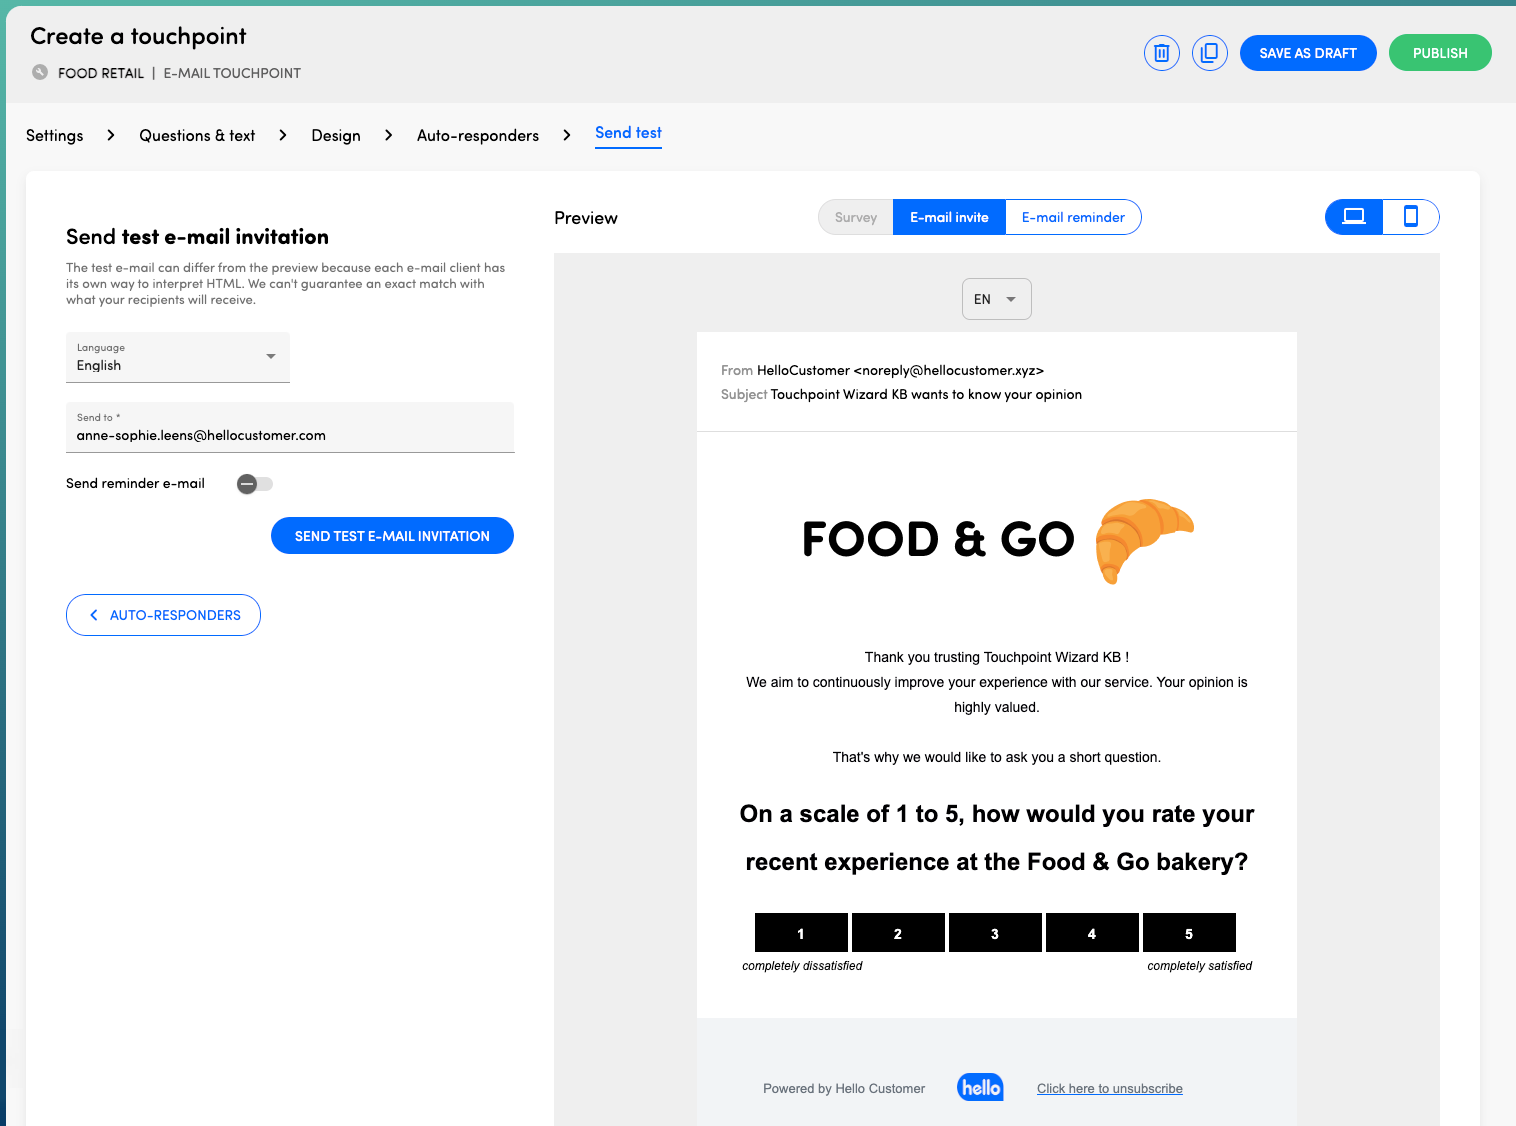
The test e-mail can differ from the preview because each e-mail client has its own way to interpret HTML. We can't guarantee an exact match with what your participants will receive.
f. Integration
Website and In-app touchpoints
i. Website touchpoints
To display your Website touchpoint into your website, simply insert the provided HTML code into the <body> section of your chosen webpage.
- Once you've added the provided HTML to your webpage, your touchpoint becomes active, enabling you to start collecting responses.
- You can further customize the integration code to include personal information and metadata with the survey answers if needed. For detailed instructions on integrating your Website touchpoint, refer to this article.
- Using a tag manager, such as Google Tag Manager, can streamline the integration process.
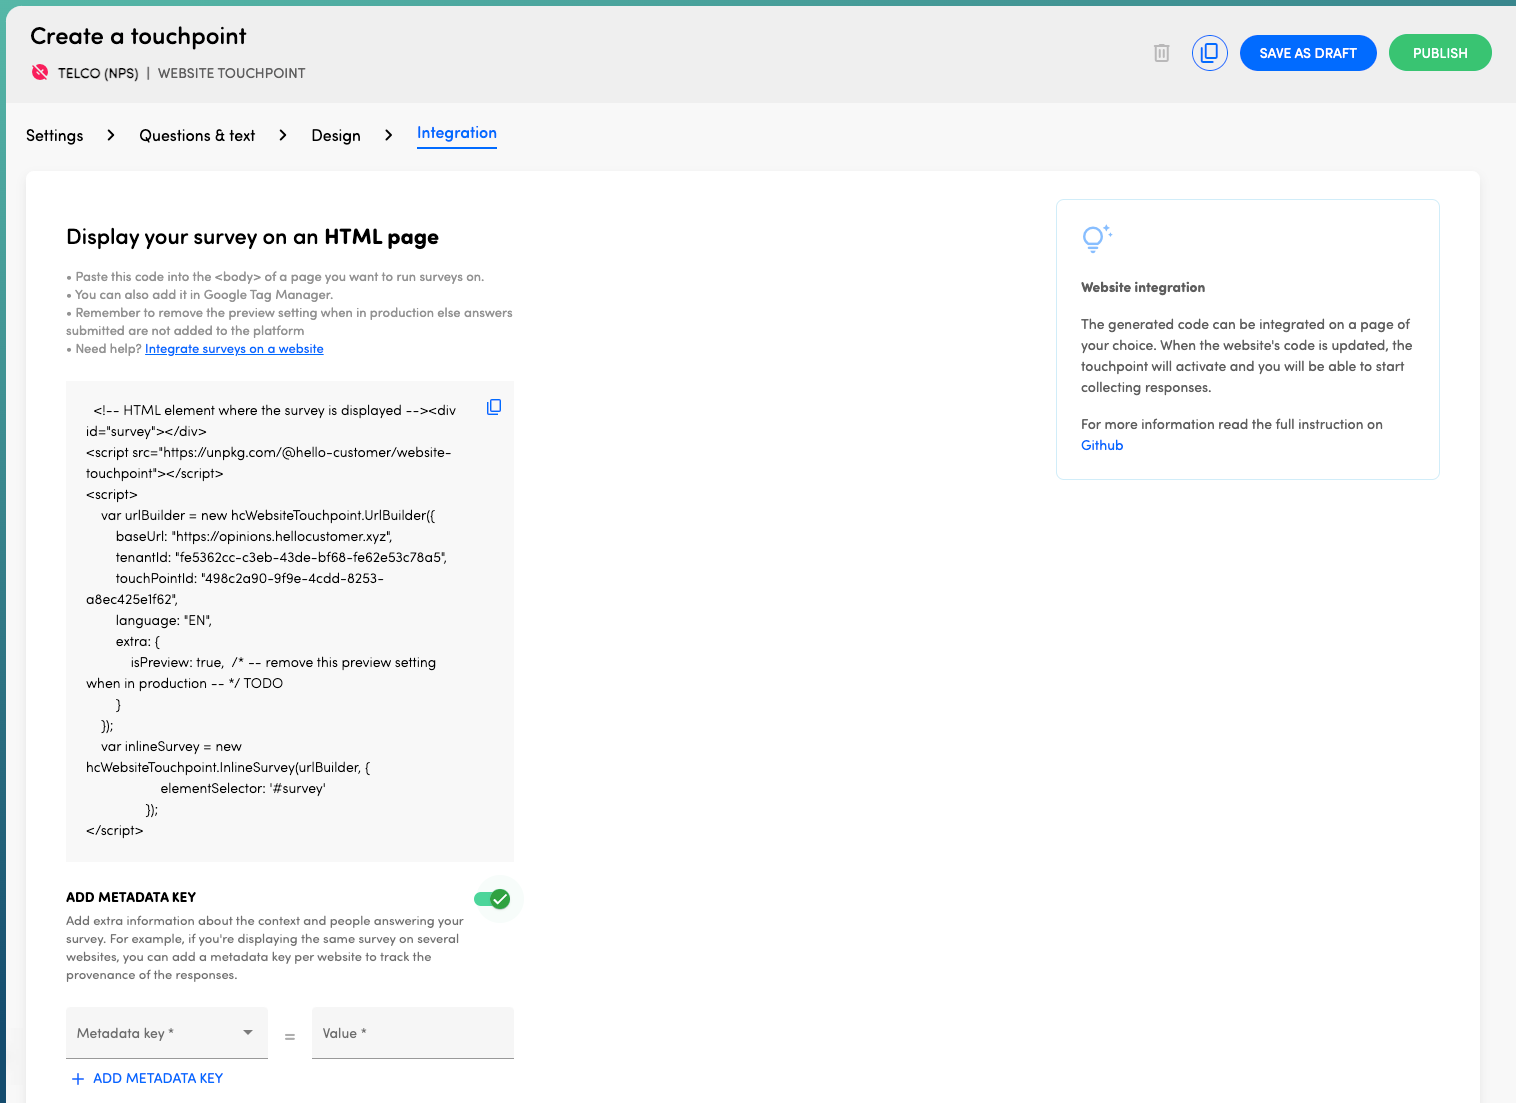
IMPORTANT
Don't forget to remove the preview setting when in production to ensure that answers submitted are properly added to the platform.
Need assistance?
- Our guide on integrating surveys on a website provides helpful instructions.
- Consult the full integration instructions on GitHub.
ii. In-app touchpoints
To display your In-App touchpoint in a mobile app, you'll need to first create an API connector for 12 months.
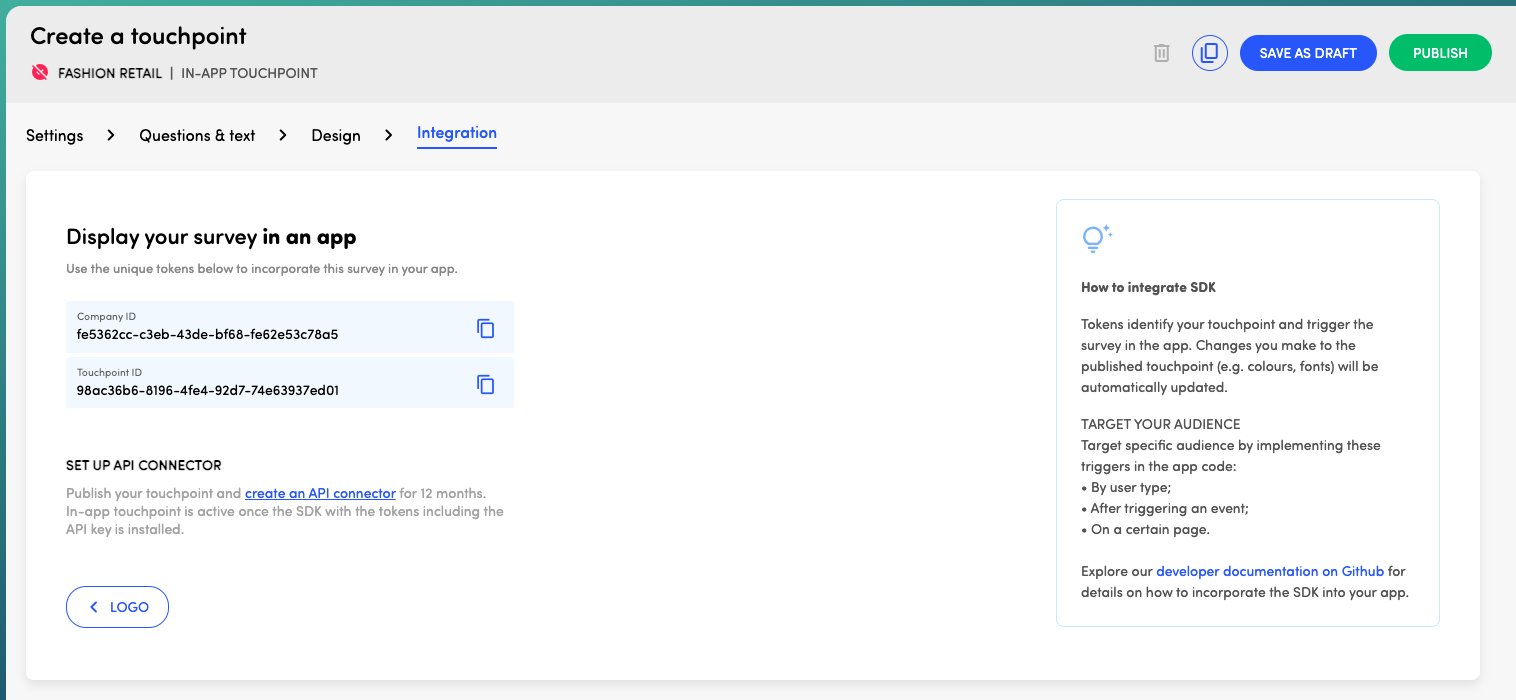
The next step involves your app developers. Providing the specific documentation for each OS will guide your developers on what needs to be done:


The integration screen displays the Company ID and touchpoint ID, which are required to be filled out in the SDK.
Once the SDK with the tokens, including the API key, is installed, your In-App touchpoint will be active. Tokens identify your touchpoint and trigger the survey in the app. Any changes made to the published touchpoint, such as colors and fonts, will be automatically updated.
To target specific audiences, implement triggers in the app code based on
- User type
- After triggering an event
- On a certain page
It's recommended to collect metadata from users using the app, which can be done using the provided SDKs. You can find more information about metadata here.
Explore our developer documentation on GitHub for detailed instructions on incorporating the SDK into your app.
3. Get your survey to participants
a. Publish your touchpoint
Once all the required steps of the wizard are completed, the 'Publish' button will become visible, indicating that your touchpoint is ready to be published. If the 'Publish' button is not visible, it means that some required steps are still pending and need to be completed before publishing.

Once your touchpoint is published, it's time to share it with your participants!
b. Add contacts to your E-mail touchpoint
There are three methods to add participants to an e-mail touchpoint:
- Platform: Access Touchpoint settings and navigate to the Participants panel. Here, you can:
- Upload a CSV file containing participant details. You'll be ask to match the columns in your file match with the metadata keys in our system. If a metadata key is not available, you'll have the option to create it.
- Use it for: Small group uploads, testing e-mail invites.
- Avoid for: Daily recurring uploads; API or FTP upload is recommended in such cases.
- Supported file: .csv, Max size: 1 MB.
- Add participants individually by entering their e-mail address, language, and corresponding metadata keys and values. Optionally you can add their first and last name, their custom ID and phone number.
- API call: Utilize an API call with the add:participants privileges. For detailed instructions, refer to our API connectors article.
- FTP: Drop a file on our FTP server for automatic upload to our platform. Contact your customer success manager or support@hellocustomer.com to set up FTP integration.

c. Get the URL of your Ask Anywhere touchpoint
With an Ask anywhere touchpoint, generate a URL that can be shared directly with your customers. You can embed this URL behind a QR code, include it in the e-mail signature, or use it in various other ways to conveniently reach your audience.
- The URL can be found in the Touchpoint settings panel within the Touchpoints section.
- You have the option to include additional context in your URL, such as personal information (first name, last name, etc.) and/or metadata (e.g., which shop the QR code was scanned in).

d. Integrate your Website touchpoint in your website
A Website touchpoint needs to be integrated into your website. The integration code can be found in the Website integration panel in the Touchpoints section.
- You can find general information about integrating your Website touchpoint in this article. Additionally, it explains how to incorporate personal information and/or metadata into your integration code.
- Using a tag manager, such as Google Tag Manager, can streamline the integration process.

e. Integrate your In-app touchpoint in your mobile app
An In-app touchpoint needs to be integrated in your app. You'll find the unique SDK tokens in the In-app integration panel in the Touchpoints section.
To begin, set up an API connector for 12 months. Then, provide your developers with the respective documentation for each operating system. This will guide them on the necessary steps to integrate the touchpoint into your app. Further details can be found here.
